There is most important rule about anything on the web is: Content is King. The very first thing, the most important thing, is that you have something to say, and that you can say it well. We definitely encourage you to take the most time preparing that – do some practice videos, let your friends see them and give you feedback as to how to best deliver your message.
While that’s the most important rule, it’s not the only rule. That’s because there are two corollaries:
- People need to see your content.
- People need to hear your content.
While we can’t tell you exactly what to say, or how it’s best for you to say it, we do have some suggestions for lighting and sound that will help make your videos for Kink Academy more accessible and enjoyable for our audience.
Three-Point Lighting
There are a lot of tutorials on the web about three-point lighting, and it’s not the only way to light things – but it’s a good baseline, and it can be done easily on a budget. Our Chief Editor, Graydancer, uses three-point lighting with scoop lamps from Home Depot that cost less than $30 total. The basic idea is this:
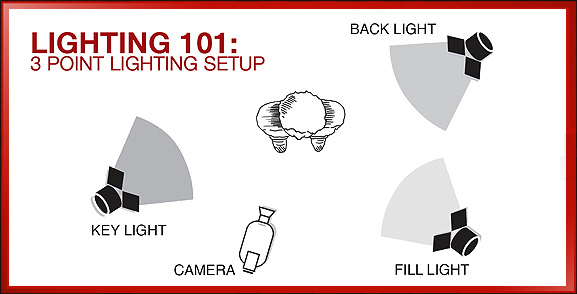
The key light should be the brightest (the “sun”), the fill is somewhat less (the “sky”) and the back light serves to make the subject pop out of the background.
A word about background: you want it to be both “not boring” and also “not too busy.” A neat, arranged space is fine, but a totally empty one often seems artificial to the audience. As one sex educator puts it: “Clean your room!” and that will be fine.
Also check that the background isn’t affecting the subject – for example, you may want to shoot in a corner (easy to control the background!) but don’t make the rookie mistake of having the line where the walls join coming up from the middle of your subject’s head. It’s best to take the time to shoot some “practice” shots, and then watch them (again, with friends) and see whether anything is distracting.
Good Sound
If there’s one thing that can kill a great video, it’s having bad sound. There are three main parts to creating a good sound for your videos:
- A good microphone
- Good practices while shooting
- Checking Your Work
A Good Mic
Since most phones can shoot high-definition video these days, if you’re going to spend money it’s better to spend it on a good microphone. We use a Sennheiser shotgun mic when we shoot for Kink Academy, as well as lavalier clip-on mics that plug directly into the camera. Many phones now can also take mics like this, and some of them are quite professional, like this Saramonic setup for $200.
$200 may seem like a lot of money, and it is – but in the world of microphones, it’s not even mid-level. And remember: sound is going to make or break your video. Every video producer has a story about a great shoot that had to be thrown away because something went wrong with the sound. Try not to let that happen to you, and invest in good equipment. A cheaper but very good mic that works well with a variety of computers (if you’re recording using a web cam) is the series from the Blu company; you can also get lavalier mics fairly cheaply as well.
A neat workaround, if you’re doing something that is a demo, is to shoot without worrying about the sound and use your phone’s mic to record a “voiceover” later. Holding your phone close to your mouth will give you remarkably clear sound.
However, that does involve both apps on the phone and a bit more editing process, so there may be a learning curve if you choose to try that. Your phone mic will not work well for general video, because it will capture ambient sound too easily – and that brings us to the next point:
Good Practices
There are a few tricks to recording that you never see in the finished product but that will make your editing process much easier. The first is environment. In professional studios they have soundproofing and they still yell “Quiet on the set!” to try and prevent that person who coughs, or drops a wrench, or slurps their coffee, and the big expensive microphone (see above) picks it up. The standing joke among video crews is saying “We’ll fix it in post!” meaning post-production, but it’s only funny because they know that there are some things you can’t fix in post.
Part of your environment is also your wardrobe. The good news is that it doesn’t have to be complicated! Wear something that you are comfortable in. We have had educators teach in everything from full fetish wear to hawaiian shirts so wear whatever is appropriate for the clip topic and your own personal style! But whatever the outfit, please make sure it’s wrinkle-free, clean, and free of any trademarked logos that you don’t own.
Another important “best practice” is to include “bumpers” in all of your video recording. That simply means giving some space at the beginning and ending of every shot you record where nothing happens. This gives the editor (who is often also you) the ability to splice clips together in the editing program more effectively.
It’s possible that the only editing that will happen is “cutting”, and that’s great – but it’s the reason why it’s worth it to record more than one “take” of each segment that you record, so you can take the “best parts” from each one.
Please avoid jargon. These clips are designed to be educational, and it’s best to assume that our target audience has only the most basic level of knowledge about your topic. Don’t assume they will know what you’re talking about! Feel free to explain ‘vocabulary’ words, or phrases that might mean something specific in the BDSM/sexual context.
Please be friendly. We’re looking for a feeling of “a good friend talking to you about this thing you’re interested in”, not a Professor Lecturing a Student. Try to keep the ‘tone’ of the clip casual. This means talking directly into the camera, looking directly into the lens, in a normal speaking voice.
Please be concise. We need each separate clip to be 3-7 minutes long. Shorter is better. This means you will probably need to break up your presentation into segments. It’s fine to refer to earlier segments in a “series” when you are talking, or to say “we’ll cover that in a future segment,” but make sure each clip has a stand-alone concept the viewer can take away.
Please be professional, not perfect. If you need to stop and look at your notes, or would like to restate something, give a solid pause of silence before moving on to what you “would” like to be talking about. That will make it easier for you in “post-production” to find the places you need to edit. Another trick videographers use is “jazz hands” – waving your hands in front of the camera for a moment when you’re about to say something that you know will need to be edited. The waving fingers are easily spotted when you’re scanning through footage, and helps you find the places you need to edit.
Sometimes when you make a mistake while shooting, you can make it into useful footage by acknowledging that “these kinds of things happen.” As we said, this is not porn, and it’s sometimes possible to change a ‘mistake’ into a teachable moment. Modeling how to deal with things when they go wrong can be a valuable part of the video you create for your audience.
Example Scripts for Clip Segments
Opening: A clear introduction of yourself, the topic, and the part of the topic you’re going to cover in each particular clip is required at the beginning. While this may seem strange when you are recording, it is absolutely necessary so that if people watch clips out of order they know what they are watching. The intro would be something like this:
“Hi! My name is (your name), and I’m here on the Kink Academy to talk about (Big Topic). In this clip, we’re going to cover (Part of Big Topic), so if you haven’t watched earlier clips, you might want to do that!”
Safety: If you’re doing something advanced or more dangerous than usual, please do a special disclaimer that is read while looking into the camera:
“The activities I’ll be talking about in this clip can be dangerous. It is impossible to remove all risk so please take whatever safety precautions fit your own risk profile. It is highly recommended that you take a live class where you can get feedback from an instructor before trying any of these techniques.”
Consent: If you have a partner or demo bottom: “This is (partner’s screen name), who’s going to be working with me to show you some things.” Then talk directly to your partner: “Can you let them know what you’re comfortable with for this clip?” Establishing consent at the beginning of every clip is important, and please make sure to work within the negotiated boundaries through everything you demonstrate. It’s also a good practice to ask your bottom how they’re feeling both during and at the end of the clip. This can lend a depth to your message that speaks to a broader audience. We’re not expecting your partner to teach but it’s important to make sure they are acknowledged for their contribution to your clips.
Explain as you go. This is more than just specialized vocabulary words or terms – we also need to make sure that our site is as accessible as possible for our blind and deaf members. It will help if you verbally describe the tools that you’re using (“I’m going to use this wooden-handled flogger with 24” tails – those are the long leather strips that are attached and that hit the skin on my partner’s back when I swing it.”).
Remember to break things up into steps. If you’re doing a demonstration please do the activity step-by-step and verbalize & explain each step as clearly as you can – and if you are teaching something that really should have all the steps learned before trying (such as rope suspension) make sure you say that in the video!
Make room for B-Roll. Some subjects require a close up. Rather than trying to move the camera (unless you have specialized equipment for that), simply pause in the action, say something like “Here’s a closer look”, and then continue with the demonstration. After you’re done with the clip, you can re-position the camera and re-do the activity with the “close-up” shot which you can edit in afterwards with a app such as iMovie. Remember it’s always better to have too much footage than too little.
Before Ending the clip: Do a quick re-cap of the most important ‘bullet points’ from in the clip. “So, that’s how you do (Part of Big Topic). Don’t forget the most important things, which are…”
It’s helpful to reference your other clips as well as other topics on the site. “Wrapping up this clip, but in our next clip….” OR “There is some great information about safety on the site so be sure to check that out.” OR “Another great series by Lee Harrington Is available that you should see.” You’re welcome to promote your own classes, websites, or products as well, but make it a natural fit to the talk if possible.
Ending the clip: Your final wrap up of the clip should be pretty much the same as the opening. “I’m (your name) and we’re talking about (Big Topic) for KinkAcademy. Thanks for watching!”
It may seem formulaic to use these in every clip, but it gives your clips a level of consistency that will both make them easier to edit and easier for your viewers to learn from. You have to remember that while we hope people watch the clips in chronological order, they may not; making sure they know who is talking and what they are talking about helps orient them towards the information they need.